

How to Use Canva for Your Simple Design Needs: A Guide for Beaver Creek Printing Customers
Creating your own design can be fun and rewarding, especially with user-friendly tools like Canva. However, to ensure that your design prints perfectly at Beaver Creek Printing, there are a few key things you need to know. This guide will help you avoid common pitfalls and get your files ready for professional printing.
Step 1: Choosing the Right Dimensions
Before you start designing, make sure you set the correct dimensions for your project. Here are some standard sizes for common print items:
- Business Cards: 3.5” x 2” (plus bleed: 3.75” x 2.25”)
- Posters: 11” x 17” or 18” x 24” (plus bleed: 11.25” x 17.25” or 18.25” x 24.25”)
- Flyers: 8.5” x 11” (plus bleed: 8.75” x 11.25”)
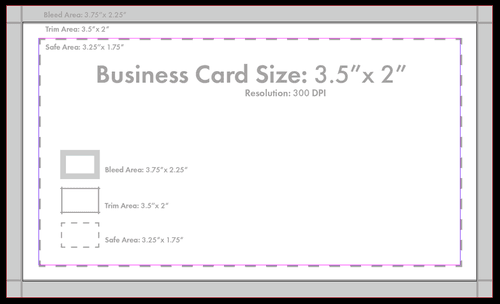
Always add a bleed area of 0.125 inches on each side. This ensures that your design extends to the edge of the paper after trimming.
Step 2: Designing in Canva
Once you have your dimensions set, you can begin designing. Canva offers a variety of templates, fonts, and images to make your design stand out. Stick to the dimensions you’ve chosen and keep key elements away from the edges to avoid them getting cut off.
Step 3: Ensuring Type Safety
When designing in Canva, it’s important to make sure your text is clear, readable, and prints correctly. Here are some tips to ensure type safety:
- Avoid fonts smaller than 8pt: Anything smaller may be difficult to read, especially on printed materials like business cards or flyers.
- Ensure strong contrast between text and background: For example, black text on a white background or white text on a dark background.
- Avoid using very light or neon colors for text, as these can be hard to read when printed.
- Keep important text within the safe zone: This means keeping your text well inside the bleed area and away from the edges of the design to avoid it being cut off during trimming.
By following these type safety tips, you'll ensure that your text is not only visually appealing but also prints clearly and professionally.
Step 4: Saving Your Design Properly
After you’re done with your design, the next step is to save your file correctly. This is crucial to ensure your design prints exactly as you envisioned.
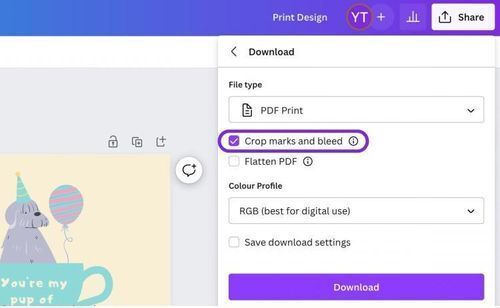
1. Click on the “Share” button at the top right of the Canva editor.
2. Select “Download” from the dropdown menu.
3. Choose “PDF Print” as your file type. This ensures high-quality print resolution.
4. Check the box for “Crop marks and bleed”. This is important to guide the trimming process at our printing facility.
5. Download the file to your computer.
By following these steps, you can ensure your designs are print-ready and look exactly as you want them to. If you have any questions, feel free to reach out to us at Beaver Creek Printing. We’re here to help!
How to Add a Bleed in Canva:
1. Open your design in Canva.
2. Click on “File” in the top left corner of the editor.
3. Select “View settings” and then enable the “Show print bleed” option. This will display the bleed area as a dashed line around your design.
4. Make sure your background and any elements that should extend to the edge of the paper go beyond this dashed line. This ensures that when your design is trimmed, there won’t be any white edges.
Common Print Sizes
Here are some more common print sizes that our customers frequently order:
- Brochures: 8.5” x 11” or 11” x 17”
- Postcards: 4” x 6” or 5” x 7”
- Banners: 24” x 48” or 36” x 72”
Remember to always set your Canva design with the proper dimensions and include a bleed if needed. This will help prevent any unexpected surprises when your design is printed.
Helpful Video Tutorials
To make this process even easier, check out these quick video tutorials below!